Beacon Villages

Under Cosdon Beacon Dartmoor Devon UK
| Beacon Villages Journal | Making Websites is Easy - Part 2 |
|||||||||||||||
Last month, I gave an example of a web site that was produced by an absolute beginner, after the minimum amount of tuition. This month, I would like to encourage anyone who is interested to "have a go" at making your own private website - at no cost - other than your time. What follows may appear complex or difficult. I assure you that it is not. It is just that spelling out all the steps, bit by bit, may make it appear so. |
||||||||||||||||
If you are reading this, then you have an internet connection via an ISP (Internet Service Provider). Nearly all ISPs allot you a certain amount of free website hosting space when you sign up with them. If you are bothering to read this, you are probably not using it. The other main requirement is a piece of software to help you design and publish your site. A lot of the ISPs also offer the use of one of these but there is a very good free alternative that you can download from the internet, called Nvu: http://www.nvu.com/download.php Choose the version that works for your operating system. There are tutorials on how to use the software on the same page as the download above. Use them as a reference if you get stuck together with the programs help files. The only other essential software you will probably already have - a word processor (WORD or equivalent) and image processor (various usually come with digital cameras or on free magazine CDs).
|
||||||||||||||||
What follows are some fundamental steps to building your own website The very hardest part is knowing what content you want to have. The very hardest part is knowing what content you want to have. I know that is repetition BUT IT IS TRUE. Everyone says “yes, yes, now get to the technical bit” but it is the CONTENT that is the hard part, believe me! A web site is made up of just three components – words, pictures and links and these are displayed on pages of a set width and varying length. BEFORE YOU GO NEAR THE COMPUTER Assume you will make a site with 5 pages. Get 5 pages of A4 and write/draw the content (words and pictures) for each page on a separate sheet. (Make sure that you have the pictures that you want to use in your computer). Keep it very simple and sparse to start with and actually write the words and use boxes to indicate where each picture will go. The simplest design tool is to use a TABLE - that is to split your page up into horizontal rows and vertical columns. This can be of any number of rows and columns but, for now, I suggest you draw a framework of two columns and six rows on each page and enter your content in this. See example below - |
||||||||||||||||
|
||||||||||||||||
It is normal to have a Welcome/Front/Introduction page which tells what your site is all about. Call this one "index". Each of your other 4 pages will be about some coherent theme/place/idea or whatever. Name each of these pages to reflect the content. You are actually going to produce 6 website pages from your 5 prepared pages. To help make your website coherent and to facilitate moving about from one page to another you will produce - a TEMPLATE which contains (at least): Your Website Name (in word or picture form) Go ahead and get a sixth sheet of A4 and draw out your template page. Use a table of 3 rows and 5 columns. |
||||||||||||||||
|
<< MENU: page names eg index, hobbies, family, photos, location | |||||||||||||||
ONLY when you have actually physically produced these 6 pages, you will be ready to go to the computer (NOT BEFORE). |
||||||||||||||||
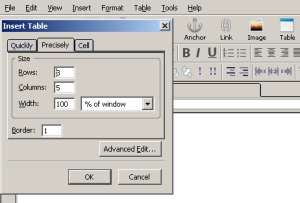
ON THE COMPUTER 1. Download and install Nvu 2. Make and name a folder for your website on your hard disk (for your web pages) 3. Inside this folder, make another folder called images (for your pictures) 4. Resize any photos that you will be using to 400 pixels wide maximum and save them in the 'images' folder. If you don't have the software, download Microsoft FREE ImageResizer from : http://www.microsoft.com/windowsxp/downloads/powertoys/xppowertoys.mspx 5. Start Nvu and choose File/New/New blank document . Save this (blank page) with the name index.html (this will be your welcome/front page) in the folder you have made for your website. Close this file. 6. Repeat the process another 4 times, saving each one with the name you have chosen for its theme/idea/concept (e.g. hobbies.html, etc.). Close each file after saving. 7. Now open a New Blank Template page (File/New/New Blank Template). You are now going to start putting some organisation to the layout of your website pages. Your cursor will be at the start of the page. Double click on the Table icon to load a table to that position with 5 columns and 3 rows. You will also be asked the width of the table. Choose 100%. This means that it will fit whatever size screen people are using to view your website. |
||||||||||||||||
 |
||||||||||||||||
8. Join Column 1, Column 2 and Column 3 of Row 1 together by click and hold down in the first cell and dragging across all three cells until they are all outlined. Then go to Table/Join Selected cells. Type the name of your website in this enlarged space. Play with the Format tab to make your text as large as possible and the colour you want. The table will probably have distorted now. To re-shape it, click in the 'name' cell and open Table/ Table Properties/Cells and then choose 60% for the cell width. 9. Join Column 4 and Column 5 of Row 1 together by click and hold down in the first cell and dragging across both cells until they are outlined. Then go to Table/Join Selected cells. Be sure that your Logo is no wider than 350 pixels and then click into this enlarged space and insert your website Logo picture by using Insert/Image/Choose File. 10. In each of the 5 Columns of Row 2, type the name of each of your five pages (e.g. Welcome, Hobbies, Family, Photos, Location - Note: You have named the first file "index" but it is normal to name the page "Welcome" or "Home" etc. on the menu). Then resize each cell (as above) with a width of 20% for each. Now add the link to each of the five names by highlighting each name and then Insert/Link/Choose File. Choose each appropriate file that you have made and named at the start. 11. In row 3, join all 5 cells together (as you did above) and insert Editable Region by clicking Insert/Templates/ Insert Editable Area. You will be asked for a name - call it 'body' (any name would do). 12.SAVE your template with a snazzy name like template1.mzt (it always gives a .mzt suffix if you save a template) Silly Bit 13. For Each Page of Your Website a) Open a new htm page based on your template. (File/New/A New Document Based On a Template/Choose File). Then insert a 2 column 6 row table into the editable area. (Right Click/Table Insert/Table and choose Rows and Columns). Save it as one of the five page names that you have already made, overwriting what was there before. b)Now load in each column/row position (cell or TD) the words or picture that you want there. To place the cursor in a cell - right click over the cell. When you have filled the page from your pre-designed A4 page, save this page. Repeat for all 5 pages. You have now made your first website. To test it, go to the folder where you have saved your site and click on the "index.htm" file. If you can change from page to page by the menu and the content is how you have designed it, you can now publish your site on the internet. It only remains to send this website to your web host server. My last contribution to this site (as editor) will be to publish the final episode of "Work Makes Free" on 16th October. I will aim to produce a simple Part 3 to this page on the same date. As all ISP's sites are different, you will need to get some details from their websites but this should not be too difficult.
|
||||||||||||||||
Will all contributors continue to send material to the site email address (on menu bar) to ensure a smooth transition. |
||||||||||||||||